
You’ve finally heard a bull case for bitcoin that clicked, and you’re ready to buy some. So how do you buy and sell bitcoin as a beginner? Well, buying and selling bitcoin is pretty intuitive, regardless if you don’t know much about how bitcoin actually works. Even if you’ve never bought or sold any investments before, if you can work a basic mobile banking app, you’ll probably be underwhelmed by the whole process. You can be a freshly minted bitcoiner in about 5 minutes from start to finish.
Where people get tripped up is the investing part of things. They want to know when to buy, or how much to buy. They want to know how to get rich with bitcoin.
Bitcoin investing for beginners doesn’t have to bee complicated. You buy bitcoin. You hold it. You sell it when you need the money. Don’t over complicate things by drawing lines on charts, making price predictions, buying with leverage, trying to time the market.
I won’t get into the nuances of when to buy or how much to buy in this article. I want to just show you the precise steps to buy and sell bitcoin for beginners so you can see just how easy it is.
In this article I’m going to show you how to buy and sell bitcoin on mobile apps, exchanges, and p2p marketplaces that specialize in bitcoin-only services. There are a wider variety of similar companies that allow you to buy and sell crypto of all different kinds, but those tend to be “bucket shops” targeting gamblers rather than average folks trying to preserve their wealth with a little bit of bitcoin.
3 Ways To Buy And Sell Bitcoin For Beginners
Buy And Sell Bitcoin on Mobile Apps

Mobile apps are the quickest way to buy bitcoin for most people these days, and you can do it sitting on the couch or in the few minutes before you go to sleep while you lay in bed. You can usually get some bitcoin in your account within a few minutes of signing up, though there will be some more ID verification processes for large purchases of bitcoin or for withdrawals to a bitcoin wallet.
The process of buying bitcoin through a mobile apps really doesn’t need much explanation, assuming you’ve ever downloaded an app to your phone and done online banking. The two main bits of advice I have based on my experience are:
- Use a bitcoin-only app. Many other apps are designed to get you to trade useless tokens. It’s their business model. Going bitcoin-only allows you to focus on the single digital asset worth holding and ensure you won’t be bothered by promotions and other market gimmicks to get you to gamble on other low-quality tokens.
- Some apps require you to deposit dollars first, then buy bitcoin. Others allow you to buy bitcoin directly after connecting to your bank account. This may have to do with whether you connect a debit card or checking account, and if you do ACH transfers, wire transfers, or use Plaid to connect to your bank.
1. Choose an App: There are many apps available on both the Android Play Store and Apple’s App Store. Some are apps owned by popular exchanges (see below), some are mobile apps for a variety banking and remittance services. I recommend avoiding most of the “popular” ones like Coinbase, Binance, Exodus, and Crypto.com since they are heavily skewed towards encouraging you to trade shitcoins. Save yourself the headache and go bitcoin-only.
2. Download and Install: Once you’ve chosen your app, download and install it on your mobile device.
3. Sign Up: Open the app and sign up for an account. This will typically require an email address, password, and some basic personal information.
4. Verification: For security reasons and to comply with regulations, many apps will require you to verify your identity. This might involve providing pictures of your ID, a selfie, and possibly proof of address.
5. Set Up Security Measures: It’s crucial to ensure your Bitcoin is secure. Set up a strong password, enable two-factor authentication (2FA) if the app offers it.
6. Deposit Funds: Before you can buy Bitcoin, you’ll need to fund your account. Most apps offer multiple deposit methods, such as ACH bank transfers, wire transfer, debit cards, or even PayPal in some cases. You may be able to connect directly to your bank account or debit card, making bitcoin-buys instant (no waiting for fiat settlement).
7. Purchase Bitcoin: If you need to deposit funds first, it may take several days to “clear” and allow you to purchase bitcoin. I prefer to buy bitcoin directly from my bank, so I recommend going for that option if it’s available to you. How much bitcoin you buy should be relative to your knowledge of and conviction in the asset.
8. Secure Your Bitcoin. If you’re planning to hold onto your Bitcoin for a long time, consider moving it from the exchange to a cold wallet. This minimizes the risk associated with centralized exchanges such as exchange hacks, account hacks, exchange bankruptcy, rehypothecation, fraud, and someone gaining access to your phone.
Always back up your wallet and write down any recovery phrases in a safe place. These are essential for restoring your wallet should you lose access to it.
How To Buy And Sell Bitcoin On Cash App

Cash App is great for new bitcoiners because it’s a very well known, trusted company that does more than just bitcoin. Many people use Cash App for its unique mobile banking features like easy dollar transfers between other Cash App users, early direct deposit, and cash back boost on purchases. You can even buy and transfer stocks to other users.
With regards to bitcoin, Cash App is great because it’s very fast and cheap to buy, hold, and send bitcoin. When I buy bitcoin with Cash App, it clears instantly and I can withdraw the bitcoin without waiting for six block confirmations (1 hour). I can send and receive on-chain or lightning, and if I’m willing to wait a day, all bitcoin transfers are free.
Step 1: Sign up for Cash App and link a bank account or debit card
Signing up for Cash App should be a familiar process. Download the app. Submit verification. Connect your accounts. The main thing I recommend doing here is to connect a debit card AND a bank account. The bank account allows you get cash into your account faster, but the debit card allows it to settle faster.
Ultimately, buying bitcoin with your debit card on file is faster, but you do have to verify some deposit information to get this working. If this is your first time connecting your accounts, regardless of which option you choose, it may take a few days to actually be able to withdraw your bitcoin.


Step 2: Enable Bitcoin on Cash App
The exact process changes from time to time as they update the app, but there may be two things that you need to enable related to bitcoin on the Cash App. I’ve had mine working for several years now, so I can’t go back and create a new account but I can generally explain the process.
The first is that you may need to enable the “Bitcoin” option. The second is that you may need to enable bitcoin deposits and withdrawals. Bitcoin should be available at the home screen, which is currently a little house icon on the left. When you open the app, it defaults to your fiat balance (dollar sign icon), so if you don’t see the bitcoin option, go to the home screen.
The other thing I recommend doing in your settings is changing your unit of account from Bitcoin to Sats. Sats are the nickname for subunits of bitcoin, and are much more satisfy to count. Would you rather have 0.000375 bitcoin or 37,500 sats (it’s the same amount)?


Step 3: Buy bitcoin
From there, it should be pretty easy to find the “buy” button in the bitcoin area of your Cash App. There will be a small fee for your bitcoin buy, around 2-3%


Selling Bitcoin On Cash App
To sell bitcoin on Cash App, navigate again to the bitcoin area. You should now see a balance displayed in bitcoin or sats, and the USD value shown below. Click the “Sell” button. You’ll have the option to sell a portion, or all of your bitcoin.
Click Next.
Again, there will be a fee associated with selling bitcoin, around 2-3%.
When all was said and done, when I bought and sold $100 worth of bitcoin on Cash App to create this tutorial, I received $95.56. That means I paid around 4.5% in fees to trade bitcoin on Cash App, which isn’t bad at all, although much higher than trading stocks, which typically trade for free!
After your bitcoin is sold, you can then spend the cash in your Cash App directly anywhere Cash App is accepted (re: Square PoS terminals), other Cash App users, or you can send the cash to your bank account.
If you would like instead to stack your bitcoin to cold storage, you can send your bitcoin from Cash App to another wallet. Cash App allows for sending to on-chain as well as lightning bitcoin wallets.


To cash out on Cash App, go to the home screen (house icon), and click the “Cash Out” button under Cash Balance. I’m not really sure why, but this amount of money seems to be different than what’s shown in the dollar sign icon, so maybe this is like your Cash App checking, and the dollar sign tab is like your debit card amount. For example, my dollar sign icon showed $0 balance, while my Cash Balance from my bitcoin sale showed $0.97 from selling $1 worth of bitcoin.
On the Cash Out screen, type the amount you want to cash out of your total cash available, and then your speed you want it to hit your bank account. Obviously, paying $0.25 to send $0.97 to my bank instantly would be dumb, but even after I sold another $10 of bitcoin and attempted to cash it out, the fee remained the same, so a $0.25 flat for instant transfer isn’t bad if you are depositing a bigger amount of money into your bank. Way better than waiting 3 days!


How To Buy And Sell Bitcoin On Strike
Strike is pretty similar to Cash App in that you can buy directly from your bank, then send and receive via on chain or lightning.
However, Strike is unique in that it allows you to spend or receive dollars or bitcoin, and it doesn’t matter what other users send or accept. In other words, someone can pay me dollars and I can receive it in bitcoin, or vice versa. The same is true of merchants, meaning when merchants use Strike, you can spend dollars and they can receive bitcoin, or vice versa.
You can also pay lightning invoices using your USD account, which is not available on any other bitcoin payments app.
Strike has no fees on bitcoin buys. Your dollars actually go farther in Strike than they do in any other app. For example, I bought $100 worth of bitcoin on Cash App and Strike within 5 minutes of each other. In Cash App, I received 377,830 sats, while in Strike I received 383,009 sats. A difference of 丰5170, or about $1.34.
Step 1: Download the Strike app and connect your bank account
Strike has bitcoin activated upon signing up, so there’s no need to do any extra step here to activate bitcoin on your account. Strike is built for buying bitcoin!
Though you may be able to buy a certain amount of bitcoin with very little information about yourself outside of an email address, recurring buys and large buys will require typical ID verification like a driver’s license, scan of your face, and maybe even a social security number. I can’t remember exactly what’s needed, as it’s been a while since I signed up.
Navigate to your personal settings in the top/right corner and add a bank account. Though you can add a debit card, they charge a 2% fee for using your card.


Step 2: Choose an amount of bitcoin to buy and confirm
I just have my bank account connected to Strike because they charge fees for using a debit card. You can buy bitcoin directly from your bank without having a cash balance on Strike, and you are also able to sell or send your bitcoin to another address immediately.
There was a time where this wasn’t possible, and I had to wait several days for the transaction to clear to be able to send bitcoin. I don’t know if the change came from an internal policy, or it’s due to bitcoin market conditions, or because my account is “trusted” now. Just be aware that you may or may not be able to move the bitcoin you bought immediately.


Step 3: Change unit of account to sats, and change passive payments to bitcoin (optional)
Two optional settings I recommend to change are to change your unit of account to sats, and change your passive payments setting to bitcoin. Sats are bitcoin subunits like cents are to dollars, and they are easier to mentally calculate. To change this setting, go to your personal profile > Personal Information > Bitcoin Unit > Satoshi.
Changing passive payments to bitcoin means any payment sent to you that is not requested will be received in bitcoin. So if someone sense USD or other fiat to your Strike username, you’ll get bitcoin. Outside of this, if you request dollars with the “receive” button, you’ll get dollars, and if you click “receive” in the bitcoin tab, you’ll receive bitcoin.


Selling Bitcoin On Strike
Selling bitcoin on strike is pretty straightforward. Click “Sell”, select an amount you’d like to sell, or “Max”, then confirm.
If you’d rather send your bitcoin to cold storage or a bitcoin app on your phone where you control the private keys, a Strike can read both lightning and on-chain bitcoin QR codes. You can send your bitcoin to a lightning wallet like Phoenix, or an on-chain-only wallet like Blue Wallet. The Strike app does NOT currently support LNURL, meaning if you sent to receive lightning bitcoin, the you’ll need to generate an invoice for a specific amount, and it may be hard to “sweep” your entire wallet without leaving a few sats behind.


To cash out on Strike, navigate to the $ icon within the app. Click “Withdraw”, and select the amount you want to withdraw to your bank account, and check that the account is correct. Confirm the transaction.
One thing that became obvious after walking through this process myself is that the zero fee policy on Strike really does save you a lot of money overall. With Cash App, I paid fees to buy AND sell. With Strike, if you transfer $100 into your app, then buy and sell bitcoin instantly (which would be dumb, this is just a hypothetical), you’ll end up with $100 again. Same same. With most other apps and exchanges, you end up with around $95 or even less sometimes due to fees.


Buy And Sell Bitcoin on Exchanges

Bitcoin exchanges are platforms that connect buyers and sellers of bitcoin in a virtual marketplace. For every buy order, there’s someone else on the other end with a sell order. A bitcoin exchange allows you to find a counterparty to take or your fiat or bitcoin, and give you the opposite in exchange. Although you are not connected directly to these trade partners, as with p2p trades (discussed later on), the bitcoin exchange facilitates the trade.
Simple bitcoin exchanges simply have a buy and sell button, with an online account to store your bitcoin. More complex bitcoin exchanges allow you to create more complex buying and selling strategies, such as triggering an automatic buy or sell at a certain price, or using leverage to make bets on directional movements in the market.
Here are some key features and functions of a Bitcoin exchange:
1. Trading Platform: Traders can use the platform to place buy or sell orders. Some exchanges off a browser-only experience, but many offer mobile apps. Some exchanges offer advanced charting tools, order types, and other trading features.
2. Order Book: Some exchanges display current buy and sell orders in the market. A user can see the demand (buy orders) and supply (sell orders) at different price levels.
3. Wallet Services: Most exchanges provide users with a digital wallet to store their cryptocurrencies. Keep in mind, an exchange wallet is “hot”, meaning funds can be drained through an exchange hack. Exchanges also own the private keys to this wallet, so they can restrict access to your funds at any time.
4. Security Features: Reputable exchanges emphasize security, offering features like two-factor authentication (2FA), spending rules like a withdrawal whitelist, or an account lockdown option. Unusual login locations or funds activity may trigger delayed withdrawal times and additional identity verification requirements.
5. Fees: Exchanges usually charge fees on trades, which can be a percentage of the trade’s value or a flat rate. They may also impose fiat deposit fess or bitcoin withdrawal fees.
How To Buy And Sell Bitcoin On River

River (affiliate) is my preferred bitcoin exchange because they focus only on bitcoin products and they own their own infrastructure. They connect directly with OTC desks where bitcoin is bought and sold behind the scenes, making sure you always have access to purchase or sell bitcoin any time you want.
They also self-custody any bitcoin which is held on their exchange, meaning if you aren’t holding your own keys, at the very least you know that River is holding them. Many exchanges outsource the task of securing your bitcoin to “trusted” 3rd parties, while the exchange only serves as a “front end” to a service for buying and selling. The bitcoin you see on your account balance is held with someone else behind the scenes.
Step 1: Sign up, verify your identity, connect a bank account
When you sign up for any bitcoin exchange, you’ll need to enter the typical identify verification information, though you may have to do a more extensive verification process with exchanges versus apps. For example, River has a whopping $250,000 maximum “instant buy” for brand new account (the largest I’ve ever seen), versus Cash App, which starts out at just a few thousand dollars, and maxes out at $100,000. River allows $100,000 per day cash withdrawals, while Cash App maxes out at $25,000 per week.
As you can see, there are some advantages to using a proper bitcoin exchange versus an app with bitcoin purchases enabled.


Step 2: Buy bitcoin or add cash to your account
The BUY BITCOIN button is super simple to find, and there will be more than one on the main River dashboard. After you click BUY, a window will pop up, with BUY as the default tab. Click the amount of USD or bitcoin you want to buy, and select your payment method.
Remember, although your bank account connects instantly, ACH takes time to clear. Although you’ll see bitcoin in your account instantly after confirming your buy, that bitcoin won’t be available for withdrawal for about two weeks.
River has a much longer “final settlement” process than any other exchange I’ve dealt with. Cash App and Strike allow for instant withdrawals once bitcoin hits your account, which is a far cry from two weeks with River. It’s a tradeoff they’ve chosen to make, as River is quite a unique and reliable bitcoin exchange. In fact, they are one of my top recommendations. This is just the main downside to consider.
This is why you may want to have some cash on hand sitting on your River account for buying the dip. The whole reason it takes so long to withdraw bitcoin from River is that ACH deposits actually take quite long to settle, so River is just being conservative in their risk management. Having cash settled in your account prior to buying bitcoin will allow for instant bitcoin withdrawals.


Step 3: Set up recurring orders and explore other River bitcoin services
River offers a few different bitcoin investing related products, including setting up an entity like an LLC to hold bitcoin for you, adding beneficiaries to your account, automatic buys, automatic withdrawals, and you can even have them host the miners for you, allowing you to get paid by your miners daily directly into your river account.
River’s recurring bitcoin buy program allows you to buy bitcoin with zero fees, and their automatic withdrawal feature means you could be buying bitcoin and withdrawing to cold storage automatically every week or month.


How To Sell Bitcoin On River
Selling bitcoin on River is very simple. Navigate to the upper-right corner of your desktop screen and click the BUY/SELL button. A window will pop up, and click over to the SELL tab. Select whether you want to sell an amount in USD or BTC, and type in the amount.
Before selling you’ll be able to PREVIEW ORDER to confirm you are selling the correct amount. You’ll also see the 1.2% fee associated with the sale (very cheap!), and the amount you’ll receive.


To cash out, you’ll need to navigate to your Brokerage Account > Cash Out. You should see at least one cash out destination. Remember, this is for fiat cash only. You cannot withdraw bitcoin to a bank account. To withdraw your bitcoin to cold storage, you need to click the SEND/RECEIVE button on the home dashboard button instead, and send your bitcoin to a bitcoin address. River supports on-chain bitcoin addresses, lightning invoices, LNURL-Pay, and lightning addresses. Because of River’s extensive integration with lightning, you can even use your River account as a lightning wallet.


How To Buy And Sell Bitcoin On Swan

Swan (affiliate) is focused on getting you to dollar cost average into bitcoin and stack sats directly into cold storage. With a minimum purchase of just $10, Swan is a great company for bitcoin “plebs” who are just stacking a bit of bitcoin daily or weekly.
After going through their signup process, it’s clear that they are focused on turning buying bitcoin into a second-nature habit. You can tweak their savings plan settings to automatically deposit money into Swan every paycheck, then buy bitcoin on a daily, weekly, or monthly basis, then automate withdrawals cold storage once everything clears.
They also offer bitcoin IRA retirement plans, and recently launched Swan Vault, which is collaborative 2-of-3 multisig product (they hold one key, you hold two).
There are a couple of things to be to be aware of if you decide to go with Swan.
One is that if you buy into their “small daily stack” rhetoric, you could end up with a crazy amount of UTXOs, making spending bitcoin in the future more expensive (higher fees) and I hate to think about the tax implications of daily bitcoin buys in the future. Plus, they don’t yet have lightning integration (coming soon supposedly), so withdrawing small amounts of bitcoin daily or weekly might be expensive considering fees are kind of high right now.
Make sure to tweak your automatic withdrawal settings to only send to cold storage after you collect a larger amount of bitcoin in your account.
The problem is then you take on custody risk of them holding your bitcoin in the meantime. Unlike River, they do not own their own bitcoin storage infrastructure, so you are actually taking on the risk of BitGo, which physically stores your coins, and Fortress Trust, which has legal authority over your coins while held at Swan.
It’s a bit of a weird setup where there are so many entities involved in handling your coins while you wait a long 10 days to withdraw to cold storage, but I guess this allows Swan to survive all the bullshit related to custody risk, and they just serve as the “front end” to allow you to buy bitcoin quickly and easily. This is the tradeoff they have chosen to make at the moment, though it seems they are making some big changes in 2023/2024 to reduce their risk in these areas.
Step 1: Sign up and verify your identity
Nothing too difficult here, just the basic signup process and identity verification. I had to take a picture of my driver’s license and do a facial scan with my phone. They send a link to your phone, which opens up the facial scanning software app, and you just look at the camera turning your head side to side. Usually I’m very careful doing this stuff to make sure it’s done right, but I submitted sloppy photos this time just to see what happened and it worked regardless.
Though I did get a warning about it possibly taking several days to verify my ID, it was done in just two minutes.


Step 2: Connect a bank account and buy bitcoin
For “instant buys”, you’ll need to connect your Swan account to a bank account with a routing and account number. They do not connect via Plaid, and cannot connect to a debit card. You can also wire money to Swan, but then you need the wire to hit your account before making the bitcoin purchase.
Keep in mind “instant buy” doesn’t mean instant withdrawal. With ACH transfers from your bank, even though you lock in the buy price at that time (instant buy), you still need to wait 10 days for your money to clear. In other words, you’ll see the bitcoin in your account, but it won’t be available for withdrawal for 10 days. With wires, you’ll wait a day or two for the money to hit, but once you see it in your Swan account it’s considered settled, and you can instantly withdraw your bitcoin from there.
Wires are typically reserved for larger money transfers, and your bank will likely charge you a fee. Wires will get your bitcoin into cold storage faster. ACH transfers take longer to clear, but are easier to lock in that purchase price instantly.
One major negative about the Swan UX. It’s annoying how prominently their IRA product is featured on the home page. It’s literally half of the page. I’m not doing the IRA thing guys. Take it away. There’s also a lot of other bullshit on the page like the Swan Signal blog and their referral program. I just want to buy bitcoin. Let’s do that.
Additionally, though I received the confirmation email instantly after purchasing, it actually look about 5-10 minutes to show up in my account which was confusing.
On the other side, one thing I really liked about the Swan UX that I don’t see anywhere else is that that they clearly show what all the money in your account is doing. You can see:
- total dollar deposits
- dollar deposits clearing
- dollar deposits cleared
- dollars available to buy bitcoin
- bitcoin awaiting unlock
- bitcoin available to withdraw
- bitcoin withdrawals pending
- bitcoin withdrawn
This way I can see what amount of bitcoin is waiting for final bank settlement, what amount I can take out, what is currently being processed, and how much I’ve sent to cold storage total. Very useful and clear information! It’s quite amazing that no other company does this. Waiting for ACH clearing or bitcoin block confirmations is very confusing as a beginner, and this makes everything much more clear.


Step 3: Set up a savings plan for automatic deposit, bitcoin purchases, and withdrawals.
Swan is built for automation, so it’s possible to automate deposits, purchases, and withdrawals, which is very convenient. There’s much less emotional buying and panic selling when you create a plan and execute the plan automatically. Bitcoin is ultimately a great tool for preserving the purchasing power of your labor over the long term, and not for speculating on price movements.
Not only is this a great strategy for regulating your emotions around investing, dollar cost averaging is a great way to keep your median/average purchase price (cost basis) low.


How To Sell Bitcoin On Swan
Swan famously doesn’t have a sell button because they want to encourage users to send their bitcoin to cold storage as a “bitcoin savings plan”, and avoid panic selling during crashes. They do actually allow you to sell bitcoin, but you have to send them an email to get it done. If you plan to sell bitcoin with Swan, don’t expect to lock in any specific kind of price because it may take a couple days to process your sell order!
If you are still set on selling your Bitcoin and withdrawing cash, please contact our client services team and tell us exactly how much Bitcoin you wish to sell. The fee to sell is 0.99%. The funds (USD) sold will go back to the original bank account on file. Contact support@swanbitcoin.com and tell us exactly how much Bitcoin you wish to sell
How To Buy And Sell Bitcoin On Unchained

Unchained specializes in multisig collaborative custody, but they allow you purchase bitcoin directly into cold storage. Unchained is a great company to work with because you get the benefit of hand holding while setting up a multisig wallet. Any bitcoin you purchase is sent directly into a high security 2-of-3 multisig vault. You control 2-of-3 keys, which gives you full control over your bitcoin at all times, but they support you with peace of mind by controlling one of the three keys.
If you are very concerned about being a beginner, they do offer “concierge onboarding”, which will basically hold your hand through the process. This includes a welcome package, video calls, 30 days of premium support (enough to get you squared away), and they’ll even ship hardware devices to you at a very reasonable $75 per unit (they don’t say which device, but I assume it’s a Trezor One at that price). This service costs $350 at the time of writing, thought the price may vary by the time you read this.
Though Unchained is not an exchange per se, you can buy bitcoin on their platform after setting up a vault. The main downside to buying bitcoin Unchained is that they have a minimum purchase on $2,000 USD.
Step 1: Sign up and upload two keys
Sign up for a personal vault account on Unchained. Their system is pretty simple to use, and you can create a 2-of-3 multisig vault relatively easily even with very little experience (and a few emails to support). This will all cost you $0.
They make it a little difficult to actually create a free account, as they want to funnel you into a 1-on-1 consultation or straight into their concierge onboarding, but I got you. Go to the Login button at the top of the page, then click Don’t have an account? Sign Up. Or you can just go with the flow and book a free consultation to chat with them about their services. They are nice. I’ve talked to their team on Zoom before.


Step 2: Create a vault
After you upload two keys, you’ll then have the ability to create a “vault”, which will use two of your keys, with Unchained being the third. This will be your 2-of-3 multisig vault. After you deposit bitcoin into this vault, you’ll need to sign with two keys in order to move the bitcoin.
If you need them to sign in a pinch, they can, but you’ll have to wait for some email verifications to get it done, and it’ll cost you a small fee. If you lose one of the keys to your vault, you can replace it with another key, but you need to upload a new key and follow the “Replace Key” steps.
Choose the two keys you uploaded in the slots offered.
Don’t forget to back up your wallet configuration file. This is something unique to multisig wallets, and it’s very important for recovery of your wallet if you have to restore your wallet somewhere other than Unchained. The option to back up your vault will appear once you have funds in the vault. You can save this on a microSD or in an email to yourself. It won’t put your funds at risk, though if someone discovered the file they could see things like wallet balances, history, etc.
You’ll need to re-validate your keys once every quarter according to their system. The keys won’t stop working if you don’t do this per se, but there will be some limitations on what you can do with the key (like create new vaults) until you re-validate.


Step 3: Buy bitcoin and send it to your cold storage vault
I’ll update the exact flow of buying bitcoin on Unchained when I have $2,000 so I can get a screenshot, but I guess you’re smart enough to take it from here. After your ID verification completes, bitcoin buys and sells should be enabled on your Unchained account.
The cool thing about Unchained which is unique from other typical exchanges is that you already have your multisig cold storage vaults set up, so you can send bitcoin directly to a cold storage vault after buying. in fact, you won’t have a choice because you can’t deposit bitcoin into Unchained custody (you always have full control over your funds).


How To Sell Bitcoin On Unchained
Unchained just updated (Nov 2023) to include a “sell” button. Before, you had to communicate directly with their OTC desk or transfer your bitcoin to an exchange. Now you can sell directly from within your vault, from cold storage and have the money land directly in your bank account.
They also offer bitcoin-backed USD loan, so you can also get dollar liquidity into your bank account without sell, but it does require that you take out a loan on your bitcoin holdings. Bitcoin volality could turn you into a forced seller!
Buy And Sell Bitcoin on Legacy Fintech Companies
Legacy fintech companies is the name I’ve give to companies like Paypal and Venmo, though there are probably more out there, and more to enable bitcoin purchases, sales, and withdrawals as time goes on. Apple could join the club at some point, but I think we’ll be waiting for that one for a while. Basically, I mean to distinguish this as a category of payment companies separate from banks, but also separate from bitcoin companies, or even crypto companies.
These need special priority even from mobile apps like Strike or Cash App because they generally have pretty shitty priorities when it comes to bitcoin and should be treated with caution. I pretty much don’t recommend buying bitcoin on Paypal, Venmo, Robinhood, and these types of apps because bitcoin is an add-on, not a focus.
They tend to offer other shitcoins, restrict access to deposits and withdrawals to individuals using privacy tools, have high prices and high fees, and are slow to adopt new bitcoin technologies.
That being said, they are widely used, and having some bitcoin is better than no bitcoin. Just make sure to withdraw to cold storage ASAP.
The steps to buying bitcoin on legacy digital financial service websites and apps are as follows
Step 1: Create an account or log into an existing account
Step 2: Navigate to the Crypto portion of the app, then activate the feature
Step 3: Find bitcoin (BTC) among the shitcoin offerings (not BCH)
Step 4: Purchase bitcoin with account balance or connected bank account
Step 5: Upload additional documentation and ID verification to enable withdrawals
Step 6: Withdraw bitcoin to cold storage or a mobile wallet
How To Buy And Sell Bitcoin On PayPal

PayPal isn’t a company you’d normally associate with bitcoin, and it’s not necessarily a company I’d recommend as a first choice to buy bitcoin. Not only have they been slow to take up bitcoin adoption versus something like Cash App, they are not bitcoin-only, which is not something I typically recommend, especially when you have so many great bitcoin-only options available to you.
However, I’d rather see you have some bitcoin rather than no bitcoin, and most people in my circles have a PayPal account, so you might be looking at some of these other bitcoin services and thinking…that’s just too much for me right now. So if you gotta do it, just buy some bitcoin on PayPal to get yourself started.
Step 1: Navigate to “Crypto” and select “Bitcoin”
Log into your account as normal and navigate to the “Finances” tab. You can either click through to Crypto > Bitcoin, or you can click directly into the Bitcoin tab below if you have already purchased bitcoin before.
If this is your first time, select the orange coin, BTC bitcoin, not the green one, BCH bitcoin. Though they are both called “Bitcoin”, they are completely different assets. The Bitcoin you hear about in the news is BTC bitcoin, not any of the other alternatives. Because bitcoin is not a company, any coin can use the “brand” name and there’s nobody to sue them for copyright or trademark infringement. You just need to be an educated investor to know the difference.


Step 2: Choose a payment method
Buying bitcoin with your bank account is the cheapest way to buy bitcoin on PayPal. You’ll still pay a fee, but using a debit card will add an additional debit card fee on top of the fee to buy bitcoin. Not worth it.

Step 3: Review and Buy Now
Double check the amount you wish to buy. You’ll see a withdrawal from your checking account in a few days, and the funds will take at least 5-7 days to clear before you can withdraw. Selling earlier is possible (why would you want to sell so quickly?), but withdrawal of the funds from your sale will still be restricted until your original deposit clears in order to prevent fraud.
You will see the bitcoin in your account instantly even if you cannot send it to an outside wallet yet.

How To Buy Bitcoin On PayPal Mobile
The steps are the same, but the navigation is different. You can see in the screenshots below that you can navigate to Finances > Crypto > Bitcoin the same as before. The app UX will likely change frequently, so your home screen app may look slightly different from the screenshots below. Once you have Crypto activated on your account, it should be visible on your home screen when you log in.


How To Sell Bitcoin On PayPal
Selling bitcoin on PayPal is pretty straightforward. Assuming you have a bitcoin balance on PayPal, you’ll need to navigate to the Finance > Crypto area of your dashboard. If you don’t have any bitcoin on PayPal, you can generate a receive address for bitcoin by click the “transfer” button (small circle with arrows).

You’ll be prompted to select an amount to sell (or sell all), then confirm the information. The money from your sale will immediately on your Paypal balance, and can be spent anywhere PayPal is accepted or then transferred to your checking account.


How To Buy And Sell Bitcoin On Venmo

While we were dating, my girlfriend (now wife), once laughed at me because I attempted to send her money for something though PayPal. She said PayPal is for old people and she asked if I had a Venmo account. I dunno. Is PayPal for old people? I guess I have never actually sent my friends money via PayPal, but I use it all the time to buy stuff from online stores, Bandcamp, or even shopping for records P2P in discord and Facebook. I can’t say that I’ve ever done that with Venmo.
So I logged back into Venmo after 5 years of non-activity, and was pretty weirded out by what I saw. People just post their online buying activity for everyone to see! I could see which of my friends were buying pizza, or bread from the farmers market, paying rent, or which shows they had gone to recently.
Do normal people desire that type of social interaction? Knowing what someone else is spending? Weird.
Anyway, yes, you can buy bitcoin on Venmo. It’s very much like the PayPal steps to buy bitcoin. In fact, PayPal now owns Venmo, so it’s not surprising.
Step 1: Create account and connect to your bank or debit card
You can add a bank account or debit card before buying bitcoin via your Venmo Profile > Payment Methods. A bank account can be connected instantly via Plaid, or you can manually type in your debit card information. You cannot buy bitcoin with a credit card. The fee for buying bitcoin with debit or bank account is the same.


Step 2: Navigate to the “Crypto” tab and verify your identity.
Pretty standard process here, and I was able to pass “verification” instantly. You’ll need name, address, and government ID number.
Once you pass verification, you can buy bitcoin instantly. Just make sure to buy bitcoin (the orange one). They offer a number of crypto currencies, including “Bitcoin Cash” (the green one), which is not the same thing as real bitcoin.


Step 3: Select bitcoin and amount you’d like to buy and confirm.
You can select from easy one-click amounts of bitcoin like $20, $50, or $100, or buy a specified amount. The bitcoin will be automatically debited to your account, but it won’t be available for withdrawal or even payments to outside bitcoin addresses for a couple of days. This is because it takes time to settle your bank transfer behind the scenes. You will, however, be able to see a balance of bitcoin and even transfer bitcoin to other Venmo accounts.


Much like PayPal, the “transfer” tab is the same two-arrow icon, so you can withdraw your bitcoin to self custody or send it to another address. You can also transfer bitcoin to other Venmo users in your contact list, or pay any on-chain address.
Just keep in mind that if you want to transfer your bitcoin out of Venmo, you’ll need to pass additional ID verification processes, including uploading a picture of your driver’s license or passport. I completely forgot about this because my PayPal account has long been verified and double/triple verified, so it came as a bit of a shock that they needed so much information about me just to be able to send bitcoin to an external address.
Also, be aware of maximum purchase and withdrawal limits. If you have a couple thousand dollars worth of bitcoin sitting on Venmo and the bull market takes off, you may end up with 10x the value in a matter of weeks, and it could be stuck on Venmo for a while. This is one of the benefits holding your bitcoin using a hardware wallet in cold storage.


How To Sell Bitcoin On Venmo
Selling bitcoin on Venmo is very much like PayPal. Click into Crypto > Bitcoin and you’ll see your balance. Click the Sell button, and type in an amount to sell, or click “Sell all”. When you sell your bitcoin for cash, the money will then be available on your Venmo balance. You can then send this money to your Venmo contacts or withdraw it to your bank account.


Buy And Sell Bitcoin On Hardware Wallet Platforms

Buying Bitcoin directly from a hardware wallet platform isn’t very common, but it’s increasingly becoming an option for users. Hardware wallets are primarily designed for secure storage rather than buying and selling bitcoin. However, some hardware wallet manufacturers may partner with bitcoin exchanges, brokers, or other payments companies to facilitate purchases from within their interfaces.
Some offer direct purchases from a bitcoin exchange, others offer a p2p marketplace for buyers and sellers to meet.
I’ve found that buying through your wallet may seem be convenient, but it tends to be quite cumbersome. You still have to pass ID verification through regulated exchanges, and buying p2p comes with high prices, delays, and the risk of fraud.
Though the exact process of buying bitcoin will vary with each hardware wallet, here’s a generalized step-by-step guide based on the possible integration of exchange services within hardware wallet platforms:
1. Choose and Purchase a Hardware Wallet: If you don’t already have one, purchase a reputable hardware wallet. Of popular hardware wallets Trezor, BitBox02, and Ledger offer bitcoin buys within their platform.
2. Set Up Your Hardware Wallet: Follow the manufacturer’s instructions to initialize your hardware wallet. Write down the recovery phrase (a series of words) and store it in a secure location (not in digital form). This is vital for restoring your wallet if you lose the hardware device or it becomes compromised. Set a strong PIN for device access. Write down the PIN because too many failed attempts can brick the device in some cases, requiring you to purchase a new wallet.
3. Connect to the App or Software Interface: Some hardware wallets have companion software or apps (like Trezor Suite for Trezor devices or the BitBox App for BitBox02). Install and launch the software, then connect your hardware wallet to your computer.
4. Navigate to the Buy Option: Some of these software platforms may have a “Buy” or “Purchase” option integrated. Clicking on it might redirect you to a partnered exchange or broker, or you may be able to enter your purchase information directly in the app.
5. Verify Identity: Though no identity is required to purchase a hardware wallet, buying any amount of bitcoin will require identity verification. This may include uploading government documents and doing a face scan.
6. Purchase Bitcoin: Enter the amount of Bitcoin you wish to purchase. You will likely be redirected to your bank’s login fields to connect directly to a debit card or checking account.
7. Verify the Transaction: Always double-check the receiving address and other transaction details. Confirm the transaction using the physical buttons on the hardware wallet (if required).
8. Completion: Once the transaction is confirmed on the blockchain, the Bitcoin will appear in your hardware wallet’s balance. Many hardware wallet softwares will show a balance in Bitcoin or Sats, and the equivalent USD value, along with a line graph of your wallet balance and value over time.
It may take up to two weeks to “clear” and show final settlement, allowing you full control over the funds. Once cleared, the bitcoin will land directly into cold storage and be secured by your offline hardware wallet.
How To Buy And Sell Bitcoin In Trezor Suite

Step 1: Log into Trezor Suite, go to wallet, click “Buy Bitcoin”
Connect your physical Trezor wallet via USB cable to your computer and log into Trezor Suite with your pin and (optional) passphrase. Click “Bitcoin” to go to your current bitcoin wallet.

Step 2: Enter the amount you want to buy, then go to “Compare Offers”
The “Buy” tab should be default, and you can enter the amount of bitcoin you’d like to buy denominated in fiat or BTC. Click “Compare Offers” to see a list of services currently offering to sell bitcoin through the Trezor portal. This is not a p2p marketplace, but rather services that specialize in selling bitcoin and other cryptocurrencies.

Step 3: Select an offer based on amount of bitcoin and payment method, then the confirm receive address in the Trezor hardware wallet matches in Trezor Suite.


Step 4: Complete signup and ID verification process through trade partner, then confirm receive address for bitcoin matches from your Trezor hardware and Trezor suite. In this case, I chose MoonPay not because it was the best offer, but because it was a brand I was familiar with.


Step 5: Complete purchase process at external partner service
When purchasing bitcoin through Trezor, you’ll be directed to an external service. You’ll need to go through the typical ID verification process there, even though you can purchase and use a Trezor with no ID required.
You’ll also need to confirm you bank account details. In this case, made a temporary deposit of USD into my account and I had to verify how much.


Step 6: Wait for confirmations. You should see a pending transaction within minutes, and it should be confirmed within an hour or two if you left the fee rate to “normal” in Trezor (normal is default).
Unfortunately, I wasn’t able to complete the bitcoin purchasing process through Trezor, no matter what I tried. Though credit card was a frequently offered option though multiple trade partners, I had two cards fail at two different trade partners. It’s possible that I could have called my credit card companies to request the transaction to go through, but I got a text message saying flat out it was denied, with no number to call for appeal, so I just let it go.
Then I attempted ACH transfer with MoonPay, but it turns out MoonPay no longer offers ACH as a method to buy bitcoin, so I just gave up.
Maybe you can get a card or trade partner to actually work, depending on who you bank with and where you are in the world, but for me it wasn’t worth the hassle because I already have exchange accounts. Regardless, this is the process of buying bitcoin on Trezor and sending it straight to cold storage.
How To Sell Bitcoin In Trezor Suite
Selling bitcoin on Trezor was easier than I thought, but it wasn’t exactly easy. Overall, I find it much easier to just have an exchange account and sell bitcoin there, but Trezor is certainly an option if exchange accounts are not available in your region.
Selling is done through trade partners available within Trezor, mainly the same ones you’d see in the “buy” offers page, like MoonPay, Simplex, Coinify, Banxa, and a few others. There is no P2P sell option. With all sales you have to go through a standard KYC process like name, address, telephone, and government ID number. Bitcoin sales may or may not be available in your region.
You have the option to send the sold funds to a bank account via ACH transfer, which can take around 2 days, or you can send them to a virtual visa debit card through MoonnPay, which makes the funds immediately available, but you can only spend them where virtual visa cards are accepted.
Selling bitcoin on Trezor via this internal system requires many more steps than with an exchange because you have to go to an external website and verify everything multiple times between Trezor and the trading partner website. I’ve laid everything out step by step (7 steps total) so you can see what it’s like beforehand.
Step 1: Go to Trade > Sell > Amount to sell > Show Offers


Step 2: Choose offer based on offer amount and payout method

Step 3: Complete rigorous ID verification process (name, address, email, phone, government ID) and connect to your bank account or alternate payout method.
I found it odd that MoonPay was able to connect to my checking via Plaid for selling bitcoin, but was unable to connect to my bank to buy bitcoin. Maybe that’s an issue with the bank, not MoonPay, as banks are known be hostile to bitcoin services.

Step 4: Confirm recipient address and amount of bitcoin in Trezor Suite and Trezor hardware wallet

Step 5: Confirm send in Trezor Suite

Step 6: Wait for trade confirmation in Trezor Suite

Step 7: Wait for email confirmation of payout
How To Buy And Sell Bitcoin On Bitbox

Step 1: Log into Bitbox and go to “Buy Bitcoin” tab
Log into your BitBox app as normal. Plug the BitBox hardware wallet into a USB port, enter your password, and open the app. Once open, there is a completely separate tab which is clearly visible on the dashboard called “Buy Bitcoin”.

Step 2: Select trade partner (MoonPay), sign up, verify ID, then enter amount to buy
The longest part of this process will be signing up to MoonPay or other available company which will facilitate the bitcoin purchase. In this case, the only available option was MoonPay, though this may change by jurisdiction, and may change in the future.
I already had a MoonPay account, so I simply signed into my account with an email and a verification code sent to the email. If you don’t have a MoonPay account, you’ll be redirected to sign up for an account and go through their ID verification process: name, address, phone, government ID number (social security).
You’ll also need to add a funding method. In this case, MoonPay only supports debit card purchases.
Once that’s complete, enter the amount of bitcoin you’d like to buy in USD or other local currency.


Step 3: Select payment method, finalize purchase, and wait for order to process
My MoonPay account already had a bank account and debit card connected, so I just selected the debit card from a dropdown menu (the only option). Before finalizing the purchase I was able to view the amount of USD to be charged to my card, the amount of sats I’d receive to my BitBox wallet, the fees I paid, and the bitcoin address for my BitBox wallet.
The wallet address was unable to be changed, so I guess the assumption is that it’s the correct address, though it would be nice if there was some sort of verification at this step.
To my surprise, the order actually went though! Because my Trezor Suite + Moonpay purchase failed so many times so I expected a failure here too, but the bitcoin purchase succeeded on the first time. It did take a long time to “process”, but I was able to see the charge on my debit card almost instantly.
My bitcoin showed up in the BitBox app balance after 15 minutes.
Unfortunately, the final amount was disappointing. I received around 7% less bitcoin than if I had bought with Strike. With BitBox + MoonPay, I received 丰344,000 to my wallet. With Strike, $100 USD would have bought 丰272,761, or a difference of 丰28,761, currently valued at $7.64.
In this case, I don’t think the convenience of buying directly into my wallet was worth the cost. This isn’t BitBox’s fault, per se, as this is just the kind of fees that MoonPay charges, but it’s their only banking partner to choose from.


How To Sell Bitcoin In The BitBox App
Once the bitcoin purchase is marked as “complete” (6 confirmations), the bitcoin will then be able sent to a different address. However, there is no “sell” feature within BitBox. To sell bitcoin, you’ll need to sign up for a bitcoin exchange, or create an account at a P2P exchange, which would allow you to sell directly to another person.
Buy And Sell Bitcoin P2P
Buying Bitcoin peer-to-peer (P2P) means you’re purchasing directly from another individual, rather than through an intermediary like an exchange. This method can offer more privacy and flexibility but also requires vigilance to avoid scams. There’s also the problem of liquidity. P2P is less popular, so there are fewer buyers and sellers. When purchasing with an exchange, you find a buyer or seller at market price any time of day, any day of the week. When buying P2P, you may pay a premium, or available sellers may not accept your preferred method of payment.
One unique benefit of P2P is that you can use some pretty wild alternative methods of payments, including gift cards, money transfer, Paypal, Zelle, cash in the mail, physical meetups, and many and others. Exchanges typically only take debit cards and checking accounts, so P2P offers a lot more options for buying bitcoin.
The main benefit of P2P is privacy, but it’s also useful for people who do not have access to banks which exchanges rely on. No ID submissions are required and most P2P platforms only connect over Tor, making your IP anonymous. With good UTXO management, you can maintain this privacy over time, keeping your bitcoin transactions private, similar to physical cash.
Here’s how you can buy Bitcoin P2P:
1. Choose a P2P Platform: There are several P2P platforms where buyers and sellers can post their offers. Popular platforms include Bisq, Peach, HodlHodl, and Robosats.
2. Sign Up and Verify: Create an account on your chosen platform. Most p2p platforms only require an email address to verify you are a real person.
3. Browse Listings: Look for sellers who use your preferred payment method. Check their prices, terms of the sale, and feedback. It’s crucial to choose sellers with a good reputation and a history of positive feedback.
4. Initiate a Purchase: Once you’ve found a suitable seller, enter the amount of Bitcoin you want to buy and initiate a trade. The platform may put the seller’s Bitcoin in escrow to ensure they can’t run off with your money without sending you the Bitcoin.
5. Communicate with the Seller: Read the seller’s terms and follow them carefully. This might include providing certain payment details or other information. Use the platform’s built-in chat or communication system to stay in touch with the seller and clarify any questions.
6. Make the Payment: Pay the seller using the agreed-upon method. This could be bank transfer, PayPal, or any other method the seller accepts.
Once you’ve made the payment, mark the payment as complete on the platform.
7. Receive Your Bitcoin: After the seller confirms they’ve received your payment, they will release the Bitcoin from escrow. The Bitcoin will then be transferred to your wallet on the P2P platform or directly to your personal Bitcoin wallet, depending on the platform’s procedure.
8. Leave Feedback: After the trade is complete, leave feedback for the seller. This helps others in the P2P community make informed decisions.
P2P Safety Tips
- Use Escrow: Always use a platform with an escrow service to reduce the risk of fraud.
- Check Reviews: Always check and consider the feedback of the seller (when available)
- Stay Vigilant: Be wary of deals that seem too good to be true or sellers pushing you to complete a transaction outside the platform.
Remember, while P2P purchases can offer flexibility and privacy, they also come with risks. Always do your due diligence, and if something feels off, it’s better to back out of the transaction.
Pros and Cons of P2P
The main benefit of p2p buying and selling is privacy. When you purchase bitcoin from another person, or sell bitcoin to another person, you do not have to give them your real name, address, government ID, email address, phone number, or other identifying information. You’re executing a simple trade: bitcoin for fiat. As long as that contract is fulfilled, then everyone is happy.
Privacy online isn’t about doing crimes as you might see it portrayed in mainstream media. Privacy in bitcoin is similar to privacy in banking, and most of us would not like anyone looking at our bank account history and balances. Because Bitcoin is an open ledger, privacy tools like p2p exchanges allow us to use bitcoin without corporations, individuals, or governments tracking our spending and saving habits
Not only that, privacy online also protects us from crime like phishing and even physical attacks.
There are two main downsides to p2p. One is that it takes extra steps to understand and become proficient at a new platform and a new type of bitcoin trading. This takes some time to learn, and some trust in new systems. It’s also more expensive to buy bitcoin p2p. You’ll pay a higher price for private bitcoin. Not only is private bitcoin is just more valuable to the end user because it’s not tied to all your other transactions, individual sellers have to be incentivized by profits to sell their bitcoin, thus the premium price.
For a $50 purchase through a typical bitcoin app like Strike, I was able to get 丰183,458. On a p2p platform, I received 丰181,693 for hte same amount of fiat. That’s a difference of 丰1765. While that’s only $0.50, or 1% of the sale, that can make a difference when buying in larger volumes, and the percentage can be much higher = up to 10% in some cases depending on the circumstances who you buy from!
How To Buy And Sell Bitcoin On Robosats

Robosats is unique in the p2p world mainly because it’s the only p2p marketplace with lightning enabled. Lightning is the faster, cheaper way to send and receive bitcoin. It’s quickly gaining adoption, but it’s not widely used yet. You might be surprised to learn that if you have a CashApp or Strike account, you already have a lightning wallet and you didn’t even know it!
Another thing that is unique about Robosats is that every time you log in, you are given a different ID. Usually with p2p marketplaces, trades are done with an emphasis on reputation, and they include some kind of rating system. You’re more likely to buy through a seller with 1000 5-star reviews than you are with a brand new seller with no account history.
While this type of reputation system is familiar and intuitive, it comes with its own tradeoffs.
One of the tradeoffs is that a common scam in reputation marketplaces is known as “skimming”, whereby you execute 99% of trades honestly, but cheat 1%. Over thousands of trades, you can successfully steal money and maintain a good standing in the community. The 1% of folks who accuse you of fraud can’t compete with your massive reputation so fraud cases are normally decided in your favor. Relying on reputation is not fool proof.
Another tradeoff of using any reputation system is that the barrier to entry is high for new participants. The vast majority of activities tends to gravitate towards more active users and it has a centralizing effect.
With Robosats, every time you log in you’re a new “robot” identity, so it levels the playing field for all p2p traders. The system is built with lightning escrow so that you don’t have to trust anyone.
Escrow in Robosats is quite cool. When you submit an order to purchase a certain amount of bitcoin, the seller is then required to pay a special kind of invoice for that amount. You don’t actually get the money yet – but the seller submits a payment and it’s held in escrow by the lightning network. Their funds are not held by Robosats!
After you send your fiat payment to the seller, they manually confirm that they received payment in Robosats. Because fiat is done outside of Robosats, this manual confirmation is required. Robosats cannot detect if you send USD/fiat via CashApp, Zelle, Paypal, Strike, etc.
Once the seller confirms, escrow is automatically released to you. If the seller tries to cheat you or simply forgets and lets the timer expire, you receive half of the bitcoin in escrow as trouble for your time (the other half goes to Robosats).
If there is a dispute, you then go into arbitration through the “staff” at Robosats. It’s unclear to me who the staff are, but I guess there’s someone available behind the scenes to resolve disputes. You just submit screenshots proof you sent your payment, conversation with the seller, and whatever other evidence you have and they’ll work it out.
Step 1: Download the Tor browser and paste in Robosats onion URL
Maybe the most confusing part of Robosats is that this could be your first time using the Tor browser. The Tor browser works just like any other browser application. You download it to your computer, open it, and type in a URL. It works just like Chrome, Firefox, or Safari. The only difference is that you can use it to access websites on a different “network” than the normal internet.
Though it sounds spooky when you hear it called “the dark web” in the mainstream media, it’s really just encrypted websites that are not indexed by search engines. You find totally normal shit on the “dark web”. The reason Robosats is exclusively available via the Tor browser is that it’s a very private way to view websites.
If you are unfamiliar with Tor and internet privacy, it’s worth mentioning here that if you aren’t doing anything illegal, then there’s nothing illegal about using a private internet browser like Tor or accessing “onion sites” available on the browser.
After you download the Tor browser, open it and paste in the URL from the Robosats website (linked above). It’s the first link on the page. It begins with robosats and ends with .onion. All Tor browser links will end in a .onion extension instead of .com. It’ll take you to the official Robosats signup page.


Step 2: Generate a token, create a new “robot identity” and save your token somewhere safe
To get ready to buy bitcoin on Robosats, you’ll need a temporary “robot” identity. You’ll get a weird name and a funky avatar. This is a one-time use thing, so don’t get too attached to it. It’ll ask you to save your “token”, which is a long string of random letters and numbers. Save it on an encrypted password manager or locally on a notepad. You could even email it to yourself, but keep in mind that if someone gains access to this token they can view your bitcoin trading history.
You need this token to log back into your robot ID. This can be useful if you get disconnected from a peer or if the trade takes longer than expected to complete. Losing this ID in the middle of a trade could mean that your trade expires and you forfeit your security “bond” (step 4).


Step 3: Browse offers based on your criteria and connect to a seller
Once inside the Robosats app, you can browser available offers to buy or sell bitcoin. Click the “Buy” tab, and further refine any criteria you have such as amount you want to buy, and method of payment.
Robosats is still a pretty small market compared to its larger competitor Bisq, so you may not find the perfect offer for what you’re looking for. However, it’s a growing market, and I found more than 60 offers available with at least 5-10 payment methods available. Robosats is great for finding small bitcoin purchases. Much better than any other p2p marketplace IMO.
Click through to the seller you want to connect with. You’ll notice the screenshots below are from a variety of sellers I looked at or contacted because the screenshots were taken over the course of a few sessions.


Step 4: Pay the refundable “bond” and submit payout information (lightning invoice)
Once connected, you’ll be asked to pay a “bond”, which is a kind of insurance to keep you honest in the trade. I’m not sure if the bond price is related to the amount you with to buy, but I bought $50 worth of bitcoin and paid a bond of $1. The bond was paid over lightning, via lightning invoice.
One thing I found a little confusing is that it says in bold letters “You are BUYING BTC”, but you are actually paying a lightning invoice as the first step. This bold text is simply meant to say that you are starting the process to buy BTC, not that the actual step you are on is the action of buying bitcoin.
With Strike I was able to pay my lightning invoice with USD from my bank account, which is a pretty neat feature of Strike, but you can also pay with a normal lightning wallet. Keep in mind that not all lightning wallets can pay this type of invoice (“hodl invoice”). Here’s a list of compatible wallets.
Once the bond is paid, you can then submit your lightning invoice for a specific number of sats based on the amount of bitcoin you wish to buy. They’ll tell you how much to submit for your invoice in an exact amount of sats based on the current value of bitcoin.
The process of creating a lightning invoice will differ for each wallet, but if your wallet has lightning capabilities, there should be an option to create an invoice for a specific amount of satoshis. Pre-submitting your invoice before you connect to the seller ensures you have a compatible wallet and can actually receive the funds and avoids the headache of sending lightning bitcoin to an incompatible wallet.


Step 5: Wait for seller to deposit into escrow and request payment details
The seller may or may not be connected at the moment. There will be a timer on the offer to show how much time they have to pay the invoice. It could be anywhere from 20 minutes up to 24 hours. If a seller has 24 hours to pay the invoice, you now see why it’s useful to keep your robot ID token to log back in later, so you don’t have to watch the computer the whole time.
The seller will be paying a “hodl invoice”, that holds the money in escrow over lightning. Robosats does not control the funds at any point.
Once your invoice is paid, the seller can then chat to you in the p2p chat room. This is a totally private p2p chat room, and even Robosats cannot see or record the chat. The chat room is for working out any of the payment details between you and the seller. The seller will send over their payment details.


Step 6: Send fiat funds to seller
I gotta say, this was a bit scary going through the first time because you’re literally just sending cash to someone’s account who you’ve never met. You’re kind of trusting the system here, i.e. trusting that lightning escrow works and that Robosats can resolve any disputes correctly.
I reminded myself that the seller already paid their escrow balance. The only reason they were able to enter the chat is because they paid the invoice you sent. If the seller tries to scam you by simply lying and saying they never got paid, you can prove you send the money to the correct address by chatting to Robosats staff and sending them the necessary screenshots of your fiat account history and chat history.
Click the purple “Confirm Sent” button after the funds have been send to their address.

Step 7: Sats received confirmed!
Once the seller sees the money on their end, they’ll confirm receipt with a click, and your sats will be released to you. Since you already submitted a lightning invoice, and lightning settles instantly, you should receive instant payment!
The lightning network is still experimental, and known to have many failed or stuck payments. I’m not exactly sure what happens at this point if you hit a snag. For example, I don’t know if the hodl invoice checks the liquidity of the recipient channel, or if it’s possible to fail to find a payment route.
If something goes wrong and you don’t receive your sats, the #1 thing to try is a different lightning wallet. If you don’t have another wallet, or there’s some other issue, you can try to work out payment on chain with the seller.
Robosats also has a Telegram for support which you can find on the footer of the Robosats website.


If you are a savvy bitcoiner, you’ll notice that I’m receiving my sats on Strike, which is pretty dumb. One of the main benefits of using Robosats and other p2p networks is that the sats are “KYC-FREE”, meaning not tied to your identity through traditional financial systems. By receiving KYC-FREE sats to Strike, I just KYC’d them, meaning they are now tied to my real identity.
Why would I do that? Well, I just try to keep all my testing shit separate from my actual shit, and it was just easy to receive to Strike.
How To Sell Bitcoin On Robosats
I’ll update this soon. Too tired to do it right now. You can bet it’s something like above except you click “Create” rather than “Offers”.
How To Buy And Sell Bitcoin On Bisq

Bisq was kind of a nightmare to use, but it’s one of the most popular and longest running ways to buy p2p bitcoin. They have a bunch of shitcoins you can trade with peers as well, which is annoying. Secondly, they have their own shitcoin which is also annoying. I guess it doesn’t matter if they have shitcoins because their bitcoin trading is long-running and reliable, and I guess the $BSQ token thing doesn’t matter because it’s for governance, not for speculating, but I think those things are worth mentioning.
The nightmare of actually using Bisq was that I had to run some command line on my Mac to get the application to open, which is going to be a no-go for most Mac users. It’s not super complicated, but is a little spooky if you’re first dealing with bitcoin and you’re not really sure what this line of code is going to do to your computer.
Then, you can’t just get on and trade. You have to upload a bunch of information and you have to wait for it to sync to the bitcoin blockchain. I was trying to get most of my work done in an hour, but barely got started and then had to go take care of family stuff, and here I am back in the evening to start over. Run command line again. Wait to sync again.
The follow tutorial are just some notes I’m taking for now until I figure out the rest of bisq. This tutorial is NOT complete!
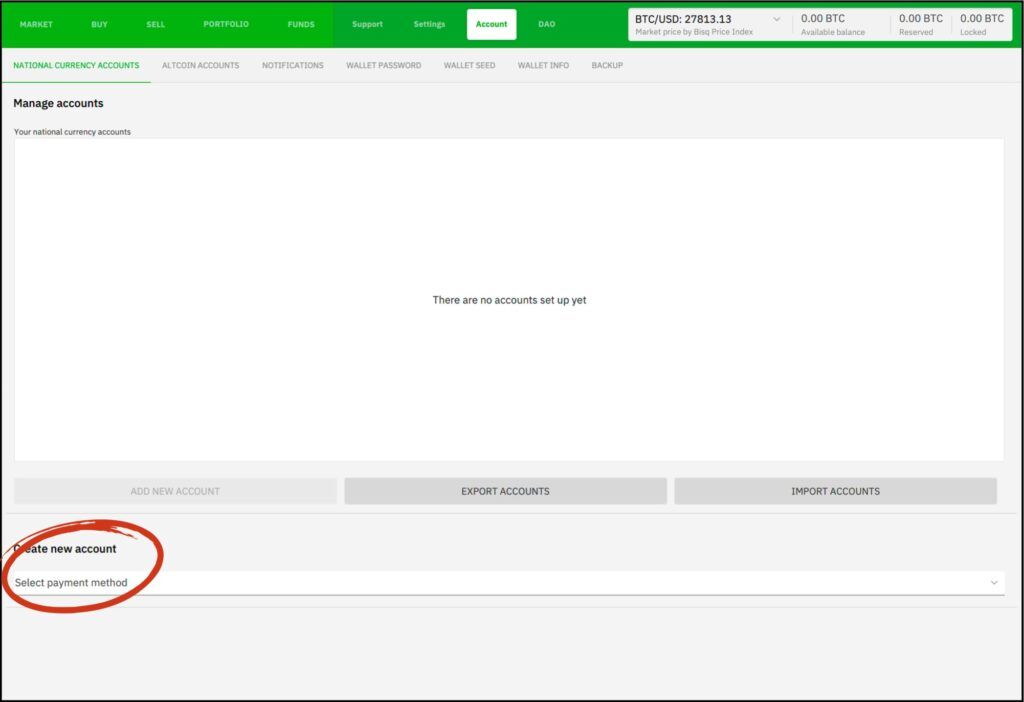
Step 1: Go to bisq.network and download the Bisq software
MacOS users may need to go into Terminal

Step 2: Open app and go to Account to set up a payment method
- set up national currency account (information is stored locally)
- select payment method (long list!)
- understand limitations of payment method choice
Step 3: Set up wallet password, write down seed phrase, create wallet backup
- confusing. seed says make password first. password says make seed first. ???
- READ BACKUP GUIDE

Step 4: Wait for wallet to sync to bitcoin blockchain, wait for DAO to sync
- Settings > BISQ network > Bottom of page
- Takes way more time than I’d like. Each time it boots up? That really sucks. I close the application thinking it froze because I only saw two related offers compared to 12 I saw previously.
- 19:25 – 8:31. Over 1 hour to sync the blockchain. DAO still not synced.


Step 5: Browse offers and sort by fiat payment method
- surprised by really high minimums. Also require 50% deposit in some cases.
- smaller amounts have crazy high exchange rates. $41k for $28k bitcoin

How To Buy And Sell Bitcoin On Hodl Hodl

Hodl Hodl also does bitcoin lending, but I’m just going through the process of buying and selling bitcoin on Hodl Hodl here.
Step 1: Create account, Click “Buy BTC”, browse offers and sort by criteria
Pretty basic stuff here. Hodl Hodl is much different than Robosats in that you are doing to create a traditional “account” at the Hodl Hodl website, using an email address, and you’ll be building a reputation as a buyer and/or seller over time. I recommend using pseudonymous information for privacy, so don’t use a real name for your “Nickname”, and don’t upload a real picture of yourself.
Once your account is confirmed via email, you can click the “Buy BTC” button and sort offers by criteria like:
- currency
- amount of bitcoin you’d like to buy
- payment types and methods
- country of origin
Click through to an offer and you can view the details of the specific offer such
- rating of seller
- number of trades completed by the seller
- price of bitcoin offered (premium)
- limits placed on the sale (amount, conditions)
- payment window (you are required to pay within a specific window of time)
- btc confirmations
The BTC confirmations metric was a little confusing to me. Every single offer I checked showed 1 confirmation. I guess this is “good” because it implies a quick transaction, but as a buyer wouldn’t I want more confirmations to make sure they don’t try to double spend on the contract? Maybe it has something to do with relinquishing their side of the multisig escrow after just 1 transaction. I’m not really sure how the multisig escrow works in this case. Every single offer was 1 confirmation, so I didn’t really have a choice.


Step 2: Enter amount of bitcoin in fiat value, paste in your bitcoin receive address, check terms of sale
Once you find an offer you like, double check the terms of the trade such as:
- amount to buy
- purchase price (premiums vary)
- trading fee
- hodl hodl fee
- estimated transaction fee
After you accept the offer, the page blurs out. The contract is considered “pending”, until the seller accepts the contract. I assume this is done to prevent issues during wild price fluctuations. At this point it was late in the night for me, so I had to peace out for the evening.


Step 3: Click “Generate Escrow”, create payment password, wait for seller to respond and deposit bitcoin escrow
At some point over the next morning, the page the seller had accepted the contract. The next step was to generate the escrow contract and create a payment password. I’m not sure if this payment password will be required of all future contracts or if each password is a one-time use. Save it just in case. At the very least, you’ll need it for this contract.
More waiting is next. We need the seller to create their own payment password, and then deposit bitcoin into the contract. When buying and selling bitcoin online globally, you can imagine it’s hard to coordinate being online at the same time, so it’s good that this type of contract can be executed automatically without you needing to be present.


Step 4: Wait for bitcoin to be deposited into escrow, then wait for bitcoin confirmations
I’m not sure why the seller waited so long to deposit bitcoin into escrow. The bitcoin goes into an escrow contract, so it’s not like we had to be online at the same time. His deposit window actually expired, but I wasn’t worried about it so I just let it go and sent him a message. I would think he would have just deposited his bitcoin at the time of creating his password. Maybe he wanted to make sure I was online so that my payment window didn’t expire. Not sure.
Regardless, we eventually did cross paths the next day, and he deposited bitcoin into the contract. The terms of the sale was that escrow would be considered complete after one confirmation, so when one confirmation hit, the contract was initiated, and his payment method was revealed to me.
You’ll see a big warning sign to NOT pay until the the correct amount of confirmations hit the blockchain.

Step 5: Send fiat payment to seller in requested amount and method, Click “I’ve Sent The Payment”
After you are given the go ahead by Hodl Hodl, send the money to the seller. Payment methods vary, but you could be sending money to a user name, account number, or crypto address. If you need further confirmation to make sure you’re sending it to the right place, be sure to confirm with the seller.
Remember, you have a payment window too! If you don’t pay in time, then the seller has the option to cancel the contract.


Step 6: Wait for funds to be released, review seller
Since you’ve already send a deposit address, the next step is to simply wait for the seller to complete their end. They will click a button saying they received their cash, and then their side of the escrow contract will be release, sending bitcoin to your address you previously entered.
After you receive your bitcoin, it’s you can complete your honest review of the seller. Sellers build their reputation by providing you with a service, so you can help the seller by helping them build a solid reputation on their profile.
Alternatively, if it was a pain in the ass working with them, you can be equally honestly about your negative experience to warn other future buyers. Many people don’t take the extra time to do these reviews, but they help the p2p system work smoothly and effectively for both buyers and sellers.

How To Sell Bitcoin On Hodl Hodl
Tthis post is getting a little tedious at 10,000 words so I’m just going to hit publish for now, and come back when I have the patience to try to sell come bitcoin on hodl hodl. If you figured out how to buy bitcoin on Hodl Hodl, you can figure out how to sell it. Be back soon!
How To Trade Bitcoin For Gift Cards

Once you have bitcoin, you don’t actually have to sell it for dollars in order to be able to use it. Bitcoin is money, and there are many goods and services that you can purchase with bitcoin. The number of things you can buy with bitcoin is growing every year as more small businesses owners decide to accept bitcoin, and as more digital shopping cart and “point of sale” systems integrate bitcoin.
Even so, it’s still pretty rare to run into a shop that accepts bitcoin in the wild.
What you can do instead is to buy gift cards to your favorite shops using bitcoin. It’s not a perfect solution, but it’s a great stopgap until the world decides to accept bitcoin.
There are two main benefits to using your bitcoin to buy gift cards other than just having the satisfaction of using bitcoin.
- Privacy
- Rewards
Unlike a credit card or debit card, when you buy a gift card with bitcoin, there is no name attached to the gift card. You spend it like cash. This means your real life purchases are anonymous. In addition, while your on-chain activity could possibly show that you bought something from a gift card website, it will not show what type of card you bought.
Another incentive to use gift cards is to get bitcoin rewards. There are many super attractive rewards programs that pay you somewhere between 1% up to 10% back on gift card purchases. I’m not sure how all these deals work on the back end, but presumably the gift card companies.
Many people buy gift cards with bitcoin because the have to, i.e. they are in some location or financial situation where the gift card is more useful than cash. For example, maybe they don’t have a bank account but want to do online shopping at Walmart. How do you buy something online at Walmart if you don’t have online banking? You can’t. So you need the combo of bitcoin and gift cards. Tons of people do this.
It’s a little bit of extra work to figure out what stores have gift cards, where the best deals are, get the card, shop, deal with leftover funds, and all that, but it could be worth your time depending on much effort you want to put in and how much the free sats are worth to you. I went though a phase where I stacked heavily with gift card companies and stacked tens of millions of sats over a couple years.
My favorite company to buy gift cards with bitcoin is The Bitcoin Company (affiliate). They are bitcoin-only, have great rewards from popular stores in the US, and you can even buy virtual Visa cards from them as well, making it easy to “spend” your bitcoin anywhere.


 15 Weird Ways To Mine Bitcoin
Leave a Reply